E-commerce site with vue.js + nuxt.js + apisful
Today we will put together a not very complex, but extremely perspective online store. The requirements for it are neither too much nor too less:
- visitors will be able to filter products by category
- download only images that fit the size and density of their screen
- add items to cart and place orders
- we will receive email notifications of new orders.
No one reads huge tutorials with lots of code. So, all source codes are placed on github. In this article we'll explain them and explain potentially obscure things.
All the services used in this material are free.
Source code is here Live demo is hereData and the backend
Within the tutorial it would probably be enough to put the objects of goods into an array. Nevertheless, we want to make it so that all this can be used for creating a real store. Apisful will generate the REST API and administration interface for us. Just a couple of clicks, some magic and it's done.
- Create an account here or log in here.
- Click create new project
- Enter the name of the project and make sure you choose the
E-Commercetemplate. Then everything will be created automatically and we will not have to do any extra actions - Click save
As a result, we have the following collections (it's like tables in a database):
- Categories - there we add categories of products that will appear: pants, diving masks, and so on.
- Products - this is a basic product: a t-shirt with a v-neck, for example.
- Product Variants - are variations of the basic product. For example, an olive-colored v-neck T-shirt.
The essence of Products and Product Variants is that all v-neck T-shirts have the same price and are in the same category. However, purple T-shirts remain only in sizes S and M. Olive ones are in all sizes. We put the size characteristics in Product Variants. This will allow us to change the list of available sizes while selecting a t-shirt color on the site. Here you go:
At this point, we delay the backend for now and move on.
Vue.js + Nuxt.js
Create the project
Although vue.js is really great, it only deals with one particular problem: the display layer. We need more:
- to handle page transitions - vue router will help us
- to write web components - there is a vue loader for that
- to have a local service where all the components of the site can make changes (for creating a shopping cart) - vuex is good that way
These are all separate libraries that need to be put together in addition to the vue.js. Of course, we don't want to collect anything internally, so we will use nuxt.js. It's a framework that has already put all the necessary vue libraries together and lets us just start coding.
It's extremely easy to create a nuxt.js project
yarn create nuxt-app <project-name>
# or
npx create-nuxt-app <project-name>
# or
npm init nuxt-app <project-name>
After using one of the commands above, nuxt.js will start asking us all sorts of tricky questions (and we will answer them):
- how to name the project (up to you)
- what do we want js or ts (in this manual we use js)
- which package manager we will use (yarn)
- which css framework we would like to use (we don't need it at all)
- which modules should we install (axios only)
- what about linter (up to you again)
- will we test? (not yet)
- which assembly to build (Single Page App)
- how will we deploy (Static/JAMStack hosting)
After this short conversation, nuxt.js will make conclusions. As a result we will have a folder with the project. This is what it looks like
It has everything we need and we will use a lot of it in the tutorial. There is only one thing left: we are writing styles in sass. It means that we need install packages that will compile sass into css (automatically, for sure):
yarn add --dev node-sass sass-loader
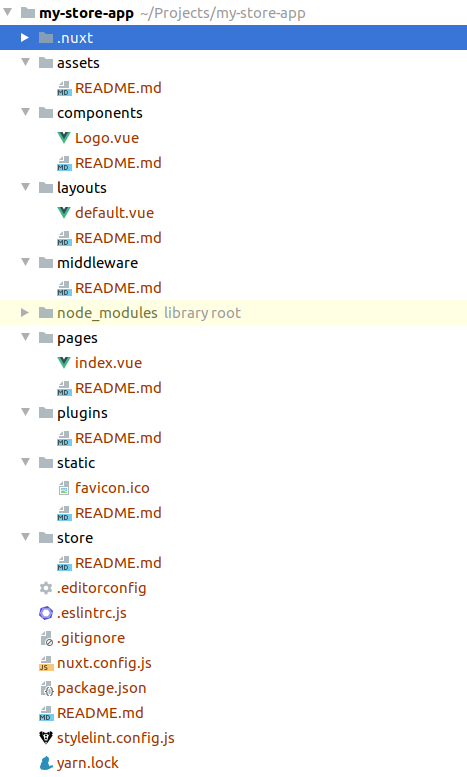
Pages and components
All pages are in the pages directory. It's worth creating a file with the extension .vue in the pages folder and nuxt.js straight away
will generate an appropriate route for it. You can read more about routers here.
File pages/index.vue is the home page of the site.
File pages/categories/_category.vue corresponds to the url in the manner of /categories/t-shirts-Xmw1kx5.
These two pages (home and categories) look the same in terms of UI, only the list of products is different. So
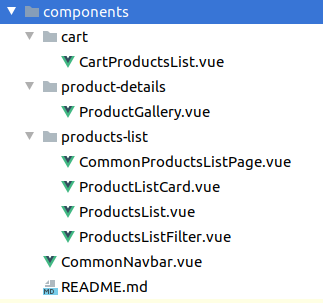
we created a component components/products-list/CommonProductsListPage.vue, which does all the work of displaying the page elements.
We use this component in the code of the main page and the category page, passing the product selection function into it.
You should put into components everything you are going to re-use or logic that you want to put separately. Here are the components we have in this project
Products fetching
Apisful automatically generates a REST API to our data scheme. That is, if we have a collection of Products, we can get a list of all products with an url query
https://api.apisful.com/v1/collections/products/
You can read more about the Apisful REST API here.
To work with API, we created a directory api. It contains the file api/index.js with the basic settings, as well as files for working with each collection.
Page templates
Using the homepage and category page examples, we've shown how you can bring repetitive UI elements (or logic) into a component.
But what about those page elements that are repeated on every (or almost every) page?
You can include the same element on every page, or you can use layouts.
Layout is a page template into which content is embedded. In our case in layout/default.vue there is a template that wraps the entire page in
<div class="container"> and contains the header of the site (the logo and the link to the cart).
There can be more than one template. The default template is applied to all pages automatically. If a page needs another template - for example layouts/blog.vue, then in the component it must be specified like this
<script>
export default {
  layout: 'blog'
}
</script>
Vuex on the example of a shopping cart
Often it happens that on the client we need a centralized repository that can be accessed from any component.
In our case, we use such storage to work with the shopping cart:
From pages/products/_product.vue we add a product to the cart.
In components/cart/CartProductsList.vue we display a list of products and allow to change the quantity.
And in components/CommonNavbar.vue we show how many items are in the cart.
The logic behind such a storage is in store/cart.js and uses Vuex.
Vuex is hard to explain in a couple of paragraphs, it makes sense to go to the website and penetrate into it.
If you think it's too complicated and you can live without vuex, it's probably true and you can postpone learning vuex for now.
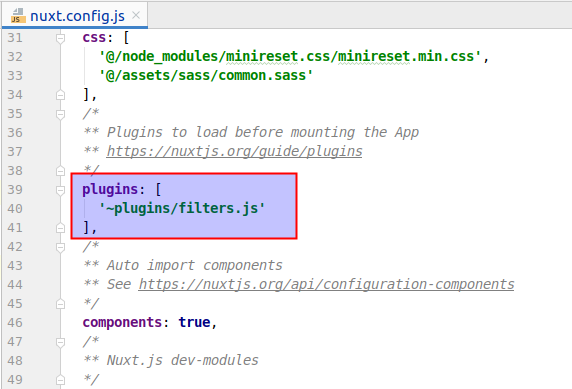
Plugins
Plugins allow you to extend the functionality of nuxt.js. Using plugins you can include third-party libraries as well as small pieces of your own code.
For example, we created a file plugins/filters.js in which we declared a global filter that formats the price.
To turn it on, we need to find the plugins array in the nuxt.config.js file and add the path to the plugin to it. Like this
About filters in vue.js you can read here, and about nuxt.js plugins here.
Assets и static
These two folders are for static files: images, icons, styles...
The difference between them is that the contents of assets will go through a webpack - minify, change the name and suffer other modifications.
Therefore, such files should be accessed through ~/assets/path/to/file, which will be replaced by the correct paths at compile time.
We use this folder for almost all statics.
All that is in static will be moved unchanged to the root directory of the site during build.
This is good for files like favicon.ico, robots.txt and so on.
New order notifications
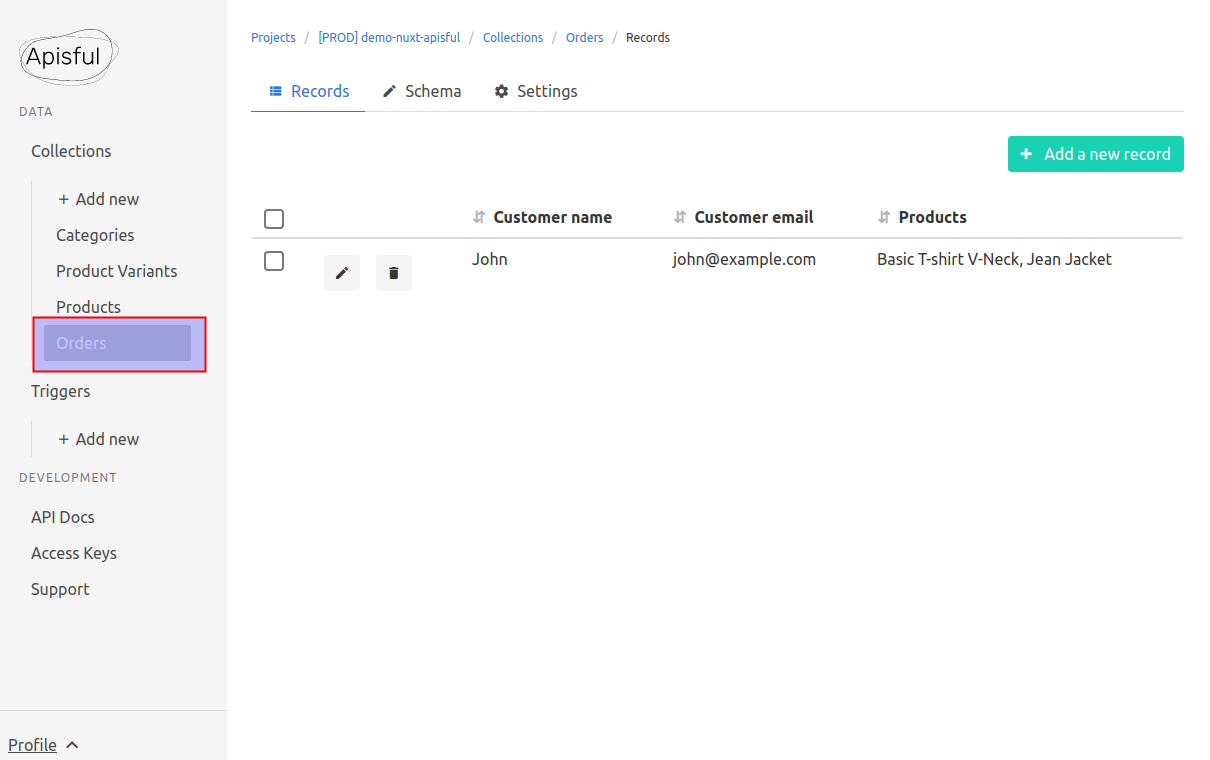
When the user clicks the "Place an order" button, we save the order in the Orders collection. How we do this can be seen in the file api/order.js.
The orders themselves can be seen in the admin, here:
In order to get notifications about new orders, we will use triggers. Creating a trigger is easy:
- In the menu on the left under
Triggers, click Add new. - Enter the name of the trigger - New order (or any other)
- Then set up the trigger logic - Send
email notificationwhennew record addedin collectionOrders - Click Save
Now every time there is a new entry in the Orders collection, we will get a notification by email.
Conclusion
Now you, I hope, understand how to use nuxt and why it is needed. What's more, how to get a backend for your project for free and in a couple of clicks.
Subscribe and you won't miss the next hilarious tutorials.